When you decide to butcher a deer at home, it’s vital to approach the process with care and precision. You’ll need the right tools and techniques to guarantee a clean and efficient job. Knowing how to properly field dress is just the beginning. From removing the legs to packaging the meat, each step is important. Ready to learn the secrets that can make your butchering experience smoother and more rewarding?
How to butcher deer at home: A Complete Guide
When you’re ready to butcher a deer at home, it’s essential to approach the task with the right tools and techniques in mind.
Start by ensuring your workspace is clean and well-organized, allowing for efficient processing. Familiarize yourself with the anatomy of the deer to make precise cuts, minimizing waste.
Take your time; rushing can lead to mistakes. Always prioritize safety by wearing gloves and using sharp knives.
Don’t forget to follow local regulations for handling and processing game. With practice and patience, you’ll gain confidence and skill in butchering, ensuring quality meat for your meals.
What tools do you need to butcher deer at home?
To butcher a deer at home, you’ll need several essential tools to make the process efficient and effective.
Start with a sharp knife, preferably a boning or skinning knife, to make clean cuts. A sturdy cutting board will provide a stable surface. You’ll also want a good set of gloves to guarantee cleanliness.
A bone saw is vital for breaking down the carcass, and a meat grinder helps with processing ground meat.
Finally, have freezer bags or butcher paper on hand for storage. With these tools, you’ll be well-equipped to tackle your deer butchering project successfully.
Why should you consider butchering deer yourself?
Butchering deer yourself can be a rewarding experience that offers numerous benefits.
First, you gain complete control over the entire process, ensuring the meat’s quality and safety. You can customize cuts to fit your family’s preferences and storage needs, maximizing the value of your harvest.
Additionally, it’s a valuable skill that deepens your connection to nature and the food you consume. Learning to butcher also saves you money compared to professional services.
Finally, the satisfaction of processing your own game can enhance your hunting experience, making it even more fulfilling and personal.
How to properly field dress a deer before butchering?
Field dressing a deer is an essential step that should be done promptly after the harvest, typically within an hour or two.
This process helps preserve the meat and prevents spoilage. Here’s how to properly field dress a deer:
- Position the deer: Lay it on its back, ensuring you have ample space around you.
- Make the incision: Using a sharp knife, cut from the base of the ribcage down to the pelvic bone, being careful not to puncture the internal organs.
- Remove entrails: Carefully pull out the organs, ensuring to keep everything clean, and discard them properly.
This prepares your deer for butchering!
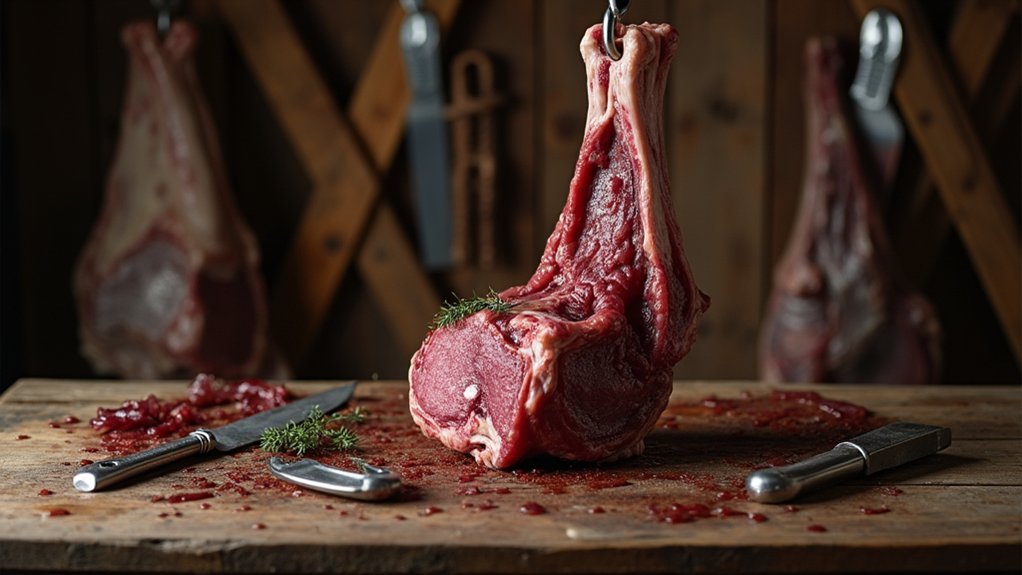
What are the step-by-step instructions for butchering deer?
After you’ve field dressed the deer, you’re ready to move on to butchering the meat for storage and cooking.
Begin by hanging the deer for easy access. Use a sharp knife to remove the front legs at the shoulder joint, then the hind legs at the hip joint.
Next, slice along the belly to separate the hide from the meat. Carefully remove the meat from the bones, starting with the backstraps along the spine.
Cut the meat into desired portions, such as steaks or roasts. Finally, package the meat securely for freezing or cooking.
Clean your workspace to maintain hygiene.
How to handle and store deer meat after butchering?
Once you’ve finished butchering, it’s crucial to handle and store the deer meat properly to maintain its quality and safety.
Follow these steps to guarantee your meat stays fresh:
- Chill Quickly: Immediately place the meat in a cooler or refrigerator to lower its temperature, preventing bacterial growth.
- Wrap Properly: Use butcher paper or vacuum seal bags to wrap the meat tightly, minimizing exposure to air.
- Label and Date: Clearly label each package with the cut name and date to keep track of freshness.
What are common mistakes to avoid when butchering deer?
While butchering deer can be rewarding, avoiding common mistakes is essential to guarantee a successful process. First, don’t rush; take your time to verify clean cuts and proper technique.
Neglecting to keep your workspace clean can lead to contamination, so always sanitize your tools and surfaces. Additionally, avoid cutting into the gut, which can spoil the meat.
Failing to properly age the meat can also result in a less flavorful product. Finally, don’t forget to label and date your packages; this helps you keep track of your harvest and verifies you use it while it’s still fresh.
How to make the most of your deer harvest at home?
To make the most of your deer harvest at home, you’ll want to plan ahead and utilize every part of the animal effectively.
Here are three ways to maximize your harvest:
- Meat Cuts: Focus on various cuts like steaks, roasts, and ground meat to diversify your meals.
- Organs: Don’t discard organs; liver and heart can be delicious and nutritious additions to your diet.
- Bones: Use the bones for stock or broth, enriching your soups and sauces.